Instruction manual for the unit passion-radio LINK
Install the driver
The
RF8000 communicates over a USB-to-serial port, that your PC
might not immediately find the right driver for.
In that case, you'll
find a "serial" device marked with a "?" in the device manager.
The
driver is provided with the software package (see above).
As I don't
like drivers that come with a setup routine, I recommend to use the
"rightclick/update driver" function of the device manager.
Just point it to the "drivers_usb_CH340" folder and windows will find and install the driver.
At that point you should see another serial port in the device manager
Register MSCOMM32.OCX
Depending
on other installations on your PC, starting the RF8000 software with the
uninventive name of "english.exe" might result in an error message. In
that case, MSCOMM32.OCX needs to be registered on your system.
To register the OCX, open an "elevated shell" (right click the start button and choose "Windows Powershell (Administrator)")
There type (with the path pointing to your rg_8000 directory):
The
program "english.exe" needs to be configured for both the COM-Port and
the Baud Rage. It defaults to COM1 and 4800. While with some luck, your
COM-Port might be "1", the baud rate ist not correct. Also: in "Model
selection" choose "RF-Power8000"
Here are the correct settings:
Model selection RF-Power8000 (F3)
Port number: set that to what your device manager shows as Com Port. In my case COM6
Baud Rate: 9600
After that, I have to press the center button to start the meter.
To set the frequency and the attenuation value hit the "spanner and
screwdriver" button.
An RC enthusiast has written his own software for the RF-Power8000
I Recommend installing Visual Studio Code with PlatformIO plugin.
PlatformIO can be downloaded directly from the PlatformIO website. There you just have to press the green button with “Install PlatformIO now”. Then just install it. If you have already installed Visual Studio Code, the PlatformIO Module can also be installed via the Plugin Manager. Now the source code can be opened in Visual Studio Code.
Start your Code editor
First we have to make some adjustments to the data/is-code.json file
We now need to edit the is-code.json settings as follows
The callsign must be changed (line 3)
The SSID and password must be filled in of you WIFI.
Latitude and Longitude must always be filled in.
If
you don't have your coordinates in your head, simply open Google Maps,
right-click on the desired location and click on ‘What's there?’
These settings have to be changed if you want to use an iGate:the active in wifi and aprs must be set from false to true.
These settings have to be changed to get a Digi:the active in digi must be set from false to true.
It is not recommended to run an iGate and a Digi at the same time.This
will be checked in a later version and only the settings of the iGate
will run (presumably the Digi Mode will be active when no WiFi
connection can be established - let's see). May board dont have the
display but I dont think you have to change any of the setting.
Choosing the right board in Platformio plug in Code
Now
the right board has to be selected, because each board is wired a
little differently (the GPIOs are used differently) or has additional
components.This can be changed in the status bar, which is currently still in Default.
Here is example of platformio.ini file. Select TTGO_T_Beam_V1_0 as in picture below
I Recommend installing Code editor with PlatformIO plugin.
PlatformIO can be downloaded directly from the PlatformIO website.There you just have to press the green button with “Install PlatformIO now”.Then just install it.If you have already installed Visual Studio Code, the PlatformIO Module can also be installed via the Plugin Manager.Now the source code can be opened in Visual Studio Code.
Start your Code editor
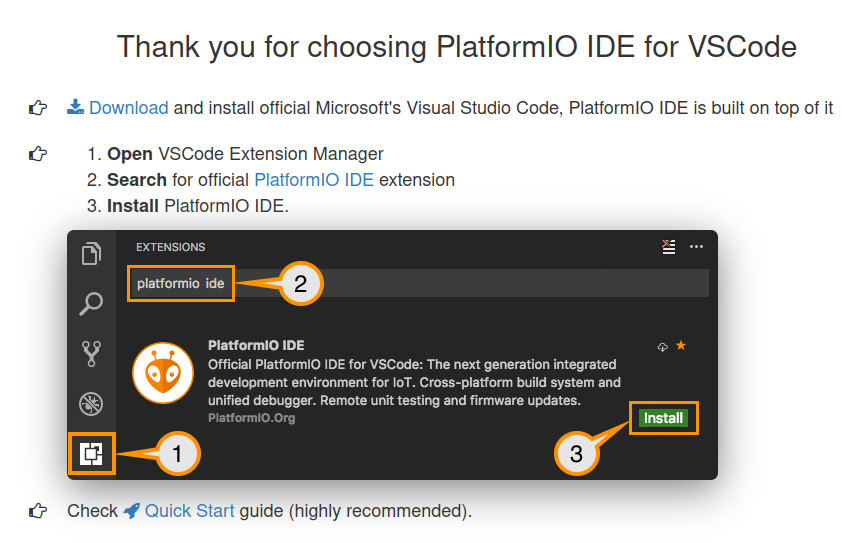
Then select Extensions and search for Platformio and install it.
Select platformio plugin
The instillation can take a while
We now need to select the LoRa_APRS_iGate folder where you have cloned
the github project above. There will be a directory LoRa_APRS_iGate
# activate for OTA Update, use the CALLSIGN from is-cfg.json as upload_port:
#upload_protocol = espota
#upload_port = <CALLSIGN>.local
[env:lora_board]
board = esp32doit-devkit-v1
#board = ttgo-t-beam-v1
build_flags = -Werror -Wall -DNO_GLOBAL_INSTANCES
upload_port = /dev/ttyUSB*
[env:lora_board_debug]
board = esp32doit-devkit-v1
build_flags = -Werror -Wall -DNO_GLOBAL_INSTANCES
build_type = debug
monitor_filters = esp32_exception_decoder
The following things can be done quickly in the status bar:Compile the firmwareFlashing the firmwareCleaning up the temporary and compiled dataSerial monitor
Compilation and upload steps
git clone https://github.com/antonjan/LoRa_APRS_iGate Install The development environment VS Code from here https://code.visualstudio.com/download Start Code and click on the botom Gear icon to install Platformio.
Then select the tracker.json and edit with the following information.
Edit the tracker.json file in the data directory to look like this changing your callsign and save the file. [CTRL-s]
We now need to compile the program. This can be done by Clicking on the icon belo red 1 on the botom toolbaar.
Now connect your LORA-APRS board to usb port of you computer. We now need to upload the compeld ferware.bi fie to the Board Click on the icon below red 2 to upload the file to your board. You should see details in the log terminal if all was sucess