I need to build a Igate for LORA on 433Mhz and I hate two options to consider.
Options
Option 1 RTL-SDR dongle with LORA software as an gateway.
Option 2 using the same TTGO-T-Beam ESP32 with GPS and Lora 433Mhz module that will be the same as my Lora tracker board.
In this Description I will be using the Option 2, I will attempt the RTL-SDR rout later.
Setting up a Lora APRS tracker using the ESP32 Lora32 TTGO-T T-Beam 433/470Mhz Module

Example of Lora signal
I was looking for a low power battery backup APRS Lora system to track Balloons and cars.

I then got the TTGO-T T-Beam witch has ESP32 with WIFI and Bluetooth.
It also has a GPS Ublock and a Lora32 TTGO 433/470Mhz and USB port.
This module is available from Giga Technology here

I found a project on Github https://github.com/lora-aprs/LoRa_APRS_iGate
It seems to be strate foreword replacing the default firmware in the SP32
So lets get Started
Lets download the project from github here
On your pc run the following
git clone https://github.com/antonjan/LoRa_APRS_iGate
cd LoRa_APRS_iGate/
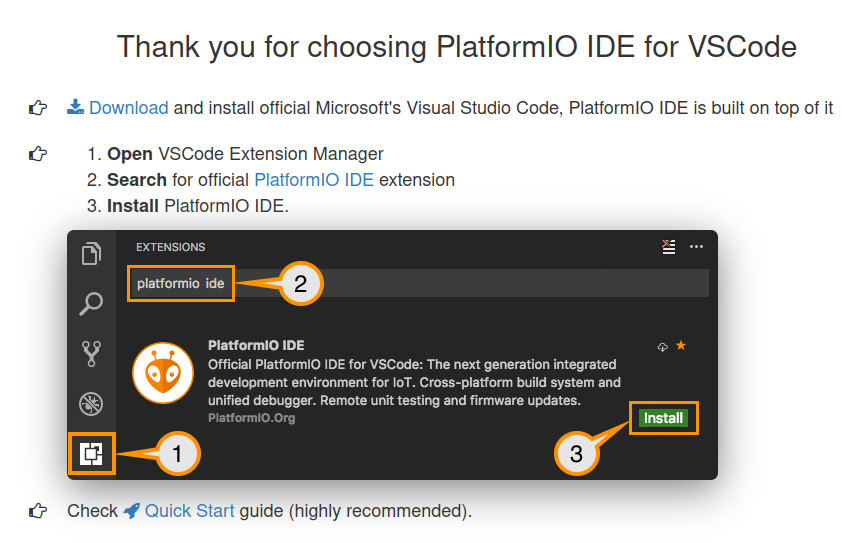
I Recommend installing Code editor with PlatformIO plugin.
PlatformIO can be downloaded directly from the PlatformIO website. There you just have to press the green button with “Install PlatformIO now”. Then just install it. If you have already installed Visual Studio Code, the PlatformIO Module can also be installed via the Plugin Manager. Now the source code can be opened in Visual Studio Code.
Start your Code editor


Compilation and upload steps

{
	"callsign":"NOCALL-7",
	"debug": false,
	"beacon":
	{
		"message":"LoRa Tracker",
		"timeout": 1,
		"symbol": "[",
		"overlay": "/"
	},
	"smart_beacon":
	{
		"active":true,
		"turn_min":25,
		"slow_rate":300,
		"slow_speed":10,
		"fast_rate":60,
		"fast_speed":100,
		"min_tx_dist":100,
		"min_bcn":5
	},
	"lora":
	{
		"frequency_rx":433775000,
		"frequency_tx":433775000,
		"power":20,
		"spreading_factor":12,
		"signal_bandwidth":125000,
		"coding_rate4":5
	}
}
We now need to compile the program. This can be done by Clicking on the icon belo red 1 on the botom toolbaar.

Blog posts and Youtube videos from other Hams
- OE1ROT (blog post - german) 14.11.2020
- DL7AG (blog post - german) 08.11.2020
- Manuel Lausmann - iGate (youtube - german) 06.11.2020
- Manuel Lausmann - Tracker (youtube - german) 02.11.2020
- OE1ROT (blog post - german) 09.12.2019
feel free to add yours or create a ticket if you want to be added.
Supported boards
You can use one of the Lora32 boards without changings:
- Heltec WiFi LoRa 32 V1 (433MHz SX1278)
- Heltec WiFi LoRa 32 V2 (433MHz SX1278)
- TTGO LoRa32 V1 (433MHz SX1278)
- TTGO LoRa32 V2 (433MHz SX1278)
- TTGO LoRa32 V2.1 (433MHz SX1278)
- TTGO T-Beam V0.7 (433MHz SX1278)
- TTGO T-Beam V1 (433MHz SX1278)
- Tracker D from OE1ACM and OE1CGC
- and sure many more...
Here are some amazon-de links for some example boards:
This boards cost around 20 Euros, they are very cheap and perfect for an LoRa iGate. Keep in minde: you need a 433MHz version!
No comments:
Post a Comment