Showing posts with label Ubuntu. Show all posts

Friday, April 26, 2024

How to get the Audio working with Ubuntu 220.04 Lenovo Thinkpad I7

 How to get the Audio working with Ubuntu 220.04 Lenovo Thinkpad I7


Lenovo Thinkpad I7


The audio setting did not recognize the motherboard intel audio devises and all I had to do is add the following to make it work

edit the /etc/modprobe.d/alsa-base.conf file and an add the following line at the end

options snd-hda-intel model=lenovo

here is a complete copy of my alsa-base.conf file just in case some other parameter also makes a differences

# autoloader aliases
install sound-slot-0 /sbin/modprobe snd-card-0
install sound-slot-1 /sbin/modprobe snd-card-1
install sound-slot-2 /sbin/modprobe snd-card-2
install sound-slot-3 /sbin/modprobe snd-card-3
install sound-slot-4 /sbin/modprobe snd-card-4
install sound-slot-5 /sbin/modprobe snd-card-5
install sound-slot-6 /sbin/modprobe snd-card-6
install sound-slot-7 /sbin/modprobe snd-card-7

# Cause optional modules to be loaded above generic modules
install snd /sbin/modprobe --ignore-install snd $CMDLINE_OPTS && { /sbin/modprobe --quiet --use-blacklist snd-ioctl32 ; /sbin/modprobe --quiet --use-blacklist snd-seq ; }
#
# Workaround at bug #499695 (reverted in Ubuntu see LP #319505)
install snd-pcm /sbin/modprobe --ignore-install snd-pcm $CMDLINE_OPTS && { /sbin/modprobe --quiet --use-blacklist snd-pcm-oss ; : ; }
install snd-mixer /sbin/modprobe --ignore-install snd-mixer $CMDLINE_OPTS && { /sbin/modprobe --quiet --use-blacklist snd-mixer-oss ; : ; }
install snd-seq /sbin/modprobe --ignore-install snd-seq $CMDLINE_OPTS && { /sbin/modprobe --quiet --use-blacklist snd-seq-midi ; /sbin/modprobe --quiet --use-blacklist snd-seq-oss ; : ; }
#
install snd-rawmidi /sbin/modprobe --ignore-install snd-rawmidi $CMDLINE_OPTS && { /sbin/modprobe --quiet --use-blacklist snd-seq-midi ; : ; }
# Cause optional modules to be loaded above sound card driver modules
install snd-emu10k1 /sbin/modprobe --ignore-install snd-emu10k1 $CMDLINE_OPTS && { /sbin/modprobe --quiet --use-blacklist snd-emu10k1-synth ; }
install snd-via82xx /sbin/modprobe --ignore-install snd-via82xx $CMDLINE_OPTS && { /sbin/modprobe --quiet --use-blacklist snd-seq ; }

# Load saa7134-alsa instead of saa7134 (which gets dragged in by it anyway)
install saa7134 /sbin/modprobe --ignore-install saa7134 $CMDLINE_OPTS && { /sbin/modprobe --quiet --use-blacklist saa7134-alsa ; : ; }
# Prevent abnormal drivers from grabbing index 0
options bt87x index=-2
options cx88_alsa index=-2
options saa7134-alsa index=-2
options snd-atiixp-modem index=-2
options snd-intel8x0m index=-2
options snd-via82xx-modem index=-2
options snd-usb-audio index=-2
options snd-usb-caiaq index=-2
options snd-usb-ua101 index=-2
options snd-usb-us122l index=-2
options snd-usb-usx2y index=-2
# Ubuntu #62691, enable MPU for snd-cmipci
options snd-cmipci mpu_port=0x330 fm_port=0x388
# Keep snd-pcsp from being loaded as first soundcard
options snd-pcsp index=-2
# Keep snd-usb-audio from beeing loaded as first soundcard
options snd-usb-audio index=-2
options snd-hda-intel model=generic
options snd-hda-intel mode=auto
#options snd-hda-intel dmic_detect=0
options snd-hda-intel model=lenovo

This what you will in gnome config


Hope this helps

Monday, June 11, 2018

How to fix Kicad PCB (pcbnew) cross cursor problem on Ubuntu 18.04

How to fix Kicad PCB (pcbnew) cross cursor problem on Ubuntu 18.04

When trying to create PCB you will get this cross cursor where ever the mouse moves.
Here is the steps that fixed my problem on Ubuntu 18.04 vanilla kicad install.

sudo add-apt-repository ppa:js-reynaud/kicad-4
sudo  apt-get update
sudo apt-get upgrade

Wala..

It is now working :-)


ref: http://kicad-pcb.org/download/ubuntu/

Thursday, February 22, 2018

Setting up my hackrf on ubuntu 17.10

Setting up my hackrf on ubuntu 17.10


sudo apt-get install gcc-arm-none-eabi

sudo apt install cmake
sudo apt install hackrf

if the hackrf command above did not work then follow the following steps


git clone https://github.com/mossmann/libopencm3.git
cd libopencm3/
ls
cd ../hackrf/
ls
git submodule init
git submodule update
cd firmware/libopencm3/
make
sudo synaptic
xhost +
sudo synaptic
make
sudo apt-get install gcc-arm-none-eabi
cd hackrf/firmware/hackrf_usb/build
mkdir build
cd build
cmake ..

hackrf_spiflash -w hackrf_usb.bin

Update firmware
hackrf_spiflash -w hackrf_one_usb.bin
hackrf_info

hackrf_cpldjtag -x hackrf_cpld_default.xsvf
hackrf_info

Thursday, November 2, 2017

How to make a persisnt ubuntu LIve Memeory stick (16GB)

How to make a persistent live Ubuntu USB Memory stick (16GB)


16Gb Flash disk
I wanted to create a boo-table Ubuntu live flash stick that will also keep my last installed applications and not default back to standard when I reboot.

Ubuntu 17.10 Live with all my apps

You need to create two partition fat32 for the Ubuntu instillation from ISO file and a ext4 casper-rw partition for the persistent part. The compleet proses is done with a application called DUS.
Here is the process to install the DUS software
sudo add-apt-repository universe
sudo add-apt-repository ppa:mkusb/ppa
sudo apt-get update
sudo apt-get install mkusb usb-pack-efi
sudo apt-get install mkusb-nox usb-pack-efi
dus


Select the following on the screens.

1) Double-Click on the i option Install(make a boot device):
2) Double-Click on the p option Persistent Live and select the .iso file:
3) Click on the USB drive to make persistent. I want to use my 32 GB one so I mark the radio button:
4) Click Use Defaults to let mkusb choose default:
5) Enter a percentage of the drive to reserve for persistence. Mine is a large (32GB) so I allot only 20% ~ 6GB. The remaining space will be turned into an empty portable drive:
6) Double check very carefully and confirm. You don't want to mess up another drive.

Waite until 'Done' is written go and get some coffie :-)

 Here was my configuration

Cruzer Blade     sdb                                                    14.6G
                 |-sdb4 iso9660 Ubuntu 17.10 amd64         1.4G
                 |-sdb2                                                         1M
                 |-sdb5 ext4    casper-rw                             12.9G
                 |-sdb3 vfat    usbboot                                 244M
                 `-sdb1                                                        1.1M


ref : https://askubuntu.com/questions/397481/how-to-make-a-persistent-live-ubuntu-usb-with-more-than-4gb
and https://help.ubuntu.com/community/LiveCD/Persistence

Monday, October 27, 2014

How to install Gqrx SDR software on Linux using your RTL dongle or Softrock receivers.

How to install the Gqrx SDR software on Linux using your RTL dongle or Softrock receivers. (Ubuntu)

RTL _dongle

The RTL Dongles is available from http://www.giga.co.za/ocart/index.php?route=product/category&path=59_63
Gqrx SDR software

Update the repository files and update your Linux to the latest versions.
sudo apt-get update
sudo apt-get upgrade

Now install the libraries ... get coffee
Now install the libraries for GQRX SDR on you Linux (Ubuntu)

sudo apt-get install cmake python-cheetah doxygen libboost-all-dev python-sphinx libfftw3-dev python-numpy libqwt-dev libgsl0-dev python-wxgtk2.6 qtcreator libpulse-dev swig libcppunit-dev libusb++-dev libusb-dev libusb-1.0-0-dev maybe some more coffee ;-)

For Ubuntu 16.04 I had to add the following libraries
sudo apt-get install qtdeclarative5-dev libqt5svg5*

Build and Install GNU Radio libraries


Create a directory where you will install the SDR software in your favorite install directory.
mkdir gqrx
goto directory you created.
cd gqrx
get the gnuradio source code
git clone http://git.gnuradio.org/git/gnuradio.git
git clone https://github.com/gnuradio/gnuradio.git
if you are using the old git before 1.6 then use this command
git clone git://gnuradio.org/gnuradio

it looks like for Ubuntu 16.04 you need to use the following git clone

git clone --recursive http://git.gnuradio.org/git/gnuradio.git
You should see
Cloning into 'gnuradio'...
got to the newly created directory gnuradio when the cloning is done
cd gnuradio
make a build directory
mkdir build
goto the build directory
cd build
Compile gnuradio
cmake ../
if you get an error -- WARNING: Found a known bad version of Boost (v104601). Disabling.
Then run cmake -DENABLE_BAD_BOOST=True ../
This can take a couple of hours depending on the speed of you Linux server.
make
Now install the newly compiled binaries into the required directories
sudo make install
Now load the the gnu drivers
sudo ldconfig

Build and Install RTL-SDR drivers
go to your favorite install directory
cd ../../../
get the latest source code from osmocom.org
git clone git://git.osmocom.org/rtl-sdr.git
go to the newly created directory
cd rtl-sdr/
Now compile the rtl drivers
create the build directory
mkdir build
go to the build directory
cd build
compile the code
cmake ../
make
now install the compiled binaries
sudo make install
load the drivers
sudo ldconfig

now copy the content of the file rtl-sdr.rules and append it to the /etc/udev/rules.d/70-persistent-cd.rules file

use your favorite editor

vi rtl-sdr.rules  and copy the content.

then open the file /etc/udev/rules.d/70-persistent-cd.rules

sudo vi /etc/udev/rules.d/70-persistent-cd.rules and append the previous files content at the end
in ubuntu 16.04 the file name was /etc/udev/rules.d/rtl-sdr.rules

This is how my file looked like

# This file maintains persistent names for CD/DVD reader and writer devices.
# See udev(7) for syntax.
#
# Entries are automatically added by the 75-cd-aliases-generator.rules
# file; however you are also free to add your own entries provided you
# add the ENV{GENERATED}=1 flag to your own rules as well.
# hp_DVD_RW_AD-7581S (pci-0000:00:1f.2-scsi-0:0:0:0)
SUBSYSTEM=="block", ENV{ID_CDROM}=="?*", ENV{ID_PATH}=="pci-0000:00:1f.2-scsi-0:0:0:0", SYMLINK+="cdrom", ENV{GENERATED}="1"
SUBSYSTEM=="block", ENV{ID_CDROM}=="?*", ENV{ID_PATH}=="pci-0000:00:1f.2-scsi-0:0:0:0", SYMLINK+="cdrw", ENV{GENERATED}="1"
SUBSYSTEM=="block", ENV{ID_CDROM}=="?*", ENV{ID_PATH}=="pci-0000:00:1f.2-scsi-0:0:0:0", SYMLINK+="dvd", ENV{GENERATED}="1"
SUBSYSTEM=="block", ENV{ID_CDROM}=="?*", ENV{ID_PATH}=="pci-0000:00:1f.2-scsi-0:0:0:0", SYMLINK+="dvdrw", ENV{GENERATED}="1"
#************************* below is what was appended ****************
# original RTL2832U vid/pid (hama nano, for example)SUBSYSTEMS=="usb", ATTRS{idVendor}=="0bda", ATTRS{idProduct}=="2832", MODE:="0666"
# ezcap EzTV668 (E4000)SUBSYSTEMS=="usb", ATTRS{idVendor}=="0bda", ATTRS{idProduct}=="2838", MODE:="0666"
# Terratec Cinergy T Stick Black (rev 1) (FC0012)SUBSYSTEMS=="usb", ATTRS{idVendor}=="0ccd", ATTRS{idProduct}=="00a9", MODE:="0666"
# Terratec NOXON rev 1 (FC0013)SUBSYSTEMS=="usb", ATTRS{idVendor}=="0ccd", ATTRS{idProduct}=="00b3", MODE:="0666"SUBSYSTEMS=="usb", ATTRS{idVendor}=="0ccd", ATTRS{idProduct}=="00b4", MODE:="0666"SUBSYSTEMS=="usb", ATTRS{idVendor}=="0ccd", ATTRS{idProduct}=="00b7", MODE:="0666"SUBSYSTEMS=="usb", ATTRS{idVendor}=="0ccd", ATTRS{idProduct}=="00c6", MODE:="0666"
# Terratec Cinergy T Stick RC (Rev.3) (E4000)SUBSYSTEMS=="usb", ATTRS{idVendor}=="0ccd", ATTRS{idProduct}=="00d3", MODE:="0666"
# Terratec T Stick PLUS (E4000)SUBSYSTEMS=="usb", ATTRS{idVendor}=="0ccd", ATTRS{idProduct}=="00d7", MODE:="0666"
# Terratec NOXON rev 2 (E4000)SUBSYSTEMS=="usb", ATTRS{idVendor}=="0ccd", ATTRS{idProduct}=="00e0", MODE:="0666"
# PixelView PV-DT235U(RN) (FC0012)SUBSYSTEMS=="usb", ATTRS{idVendor}=="1554", ATTRS{idProduct}=="5020", MODE:="0666"
# Astrometa DVB-T/DVB-T2 (R828D)SUBSYSTEMS=="usb", ATTRS{idVendor}=="15f4", ATTRS{idProduct}=="0131", MODE:="0666"
# Compro Videomate U620F (E4000)SUBSYSTEMS=="usb", ATTRS{idVendor}=="185b", ATTRS{idProduct}=="0620", MODE:="0666"
# Compro Videomate U650F (E4000)SUBSYSTEMS=="usb", ATTRS{idVendor}=="185b", ATTRS{idProduct}=="0650", MODE:="0666"# Compro Videomate U650F (E4000)SUBSYSTEMS=="usb", ATTRS{idVendor}=="185b", ATTRS{idProduct}=="0650", MODE:="0666"
# Compro Videomate U680F (E4000)SUBSYSTEMS=="usb", ATTRS{idVendor}=="185b", ATTRS{idProduct}=="0680", MODE:="0666"
# Sweex DVB-T USB (FC0012)SUBSYSTEMS=="usb", ATTRS{idVendor}=="1f4d", ATTRS{idProduct}=="a803", MODE:="0666"
# GTek T803 (FC0012)SUBSYSTEMS=="usb", ATTRS{idVendor}=="1f4d", ATTRS{idProduct}=="b803", MODE:="0666"
# Lifeview LV5TDeluxe (FC0012)SUBSYSTEMS=="usb", ATTRS{idVendor}=="1f4d", ATTRS{idProduct}=="c803", MODE:="0666"
# MyGica TD312 (FC0012)SUBSYSTEMS=="usb", ATTRS{idVendor}=="1f4d", ATTRS{idProduct}=="d286", MODE:="0666"
# PROlectrix DV107669 (FC0012)SUBSYSTEMS=="usb", ATTRS{idVendor}=="1f4d", ATTRS{idProduct}=="d803", MODE:="0666"
# Zaapa ZT-MINDVBZP (FC0012)SUBSYSTEMS=="usb", ATTRS{idVendor}=="1b80", ATTRS{idProduct}=="d398", MODE:="0666"
# Twintech UT-40 (FC0013)SUBSYSTEMS=="usb", ATTRS{idVendor}=="1b80", ATTRS{idProduct}=="d3a4", MODE:="0666"
# ASUS U3100MINI_PLUS_V2 (FC0013)SUBSYSTEMS=="usb", ATTRS{idVendor}=="1b80", ATTRS{idProduct}=="d3a8", MODE:="0666"
# Dexatek DK DVB-T Dongle (Logilink VG0002A) (FC2580)SUBSYSTEMS=="usb", ATTRS{idVendor}=="1d19", ATTRS{idProduct}=="1101", MODE:="0666"
# Dexatek DK DVB-T Dongle (MSI DigiVox mini II V3.0)SUBSYSTEMS=="usb", ATTRS{idVendor}=="1d19", ATTRS{idProduct}=="1102", MODE:="0666"# Dexatek DK 5217 DVB-T Dongle (FC2580)SUBSYSTEMS=="usb", ATTRS{idVendor}=="1d19", ATTRS{idProduct}=="1103", MODE:="0666"
# MSI DigiVox Micro HD (FC2580)SUBSYSTEMS=="usb", ATTRS{idVendor}=="1d19", ATTRS{idProduct}=="1104", MODE:="0666"
# DigitalNow Quad DVB-T PCI-E card (4x FC0012?)SUBSYSTEMS=="usb", ATTRS{idVendor}=="0413", ATTRS{idProduct}=="6680", MODE:="0666"
# Leadtek WinFast DTV Dongle mini D (FC0012)SUBSYSTEMS=="usb", ATTRS{idVendor}=="0413", ATTRS{idProduct}=="6f0f", MODE:="0666"
# Genius TVGo DVB-T03 USB dongle (Ver. B)SUBSYSTEMS=="usb", ATTRS{idVendor}=="0458", ATTRS{idProduct}=="707f", MODE:="0666"
# GIGABYTE GT-U7300 (FC0012)SUBSYSTEMS=="usb", ATTRS{idVendor}=="1b80", ATTRS{idProduct}=="d393", MODE:="0666"
# DIKOM USB-DVBT HDSUBSYSTEMS=="usb", ATTRS{idVendor}=="1b80", ATTRS{idProduct}=="d394", MODE:="0666"
# Peak 102569AGPK (FC0012)SUBSYSTEMS=="usb", ATTRS{idVendor}=="1b80", ATTRS{idProduct}=="d395", MODE:="0666"
# SVEON STV20 DVB-T USB & FM (FC0012)SUBSYSTEMS=="usb", ATTRS{idVendor}=="1b80", ATTRS{idProduct}=="d39d", MODE:="0666"
# SVEON STV21 DVB-T USB & FMSUBSYSTEMS=="usb", ATTRS{idVendor}=="2b80", ATTRS{idProduct}=="d3b0", MODE:="0666"


Building and Install gr_osmoSDR

cd ../../
git clone git://git.osmocom.org/gr-osmosdr
cd gr-osmosdr/
mkdir build
cd build/
cmake ../ -Wno-dev
make
sudo make install
sudo ldconfig


Building and Install Gqrx with command line.

git clone https://github.com/csete/gqrx.git gqrx.git
cd gqrx.git
mkdir build
cd build
cmake ..

make
sudo make install
If you want to build the code using the Qt development environment then follow the steps below

cd ../../
git clone https://github.com/csete/gqrx.git
cd gqrx
qtcreator ./gqrx.pro

A new window will open (the QT compiler).
When it opens click the build menu then the build all option.

QT Compiler

you should see The process "/usr/bin/make" exited normally.

Plug in your RTL dongle.
Now run gqrx.
gqrx

Select Yes
GQRX Should now be open. On the first run you will be prompted for a device listing.

Select your SDR (in my case RTL dongle)

 In the device drop down menu select "ezcap USB 2.0 DVB-T/DAB/FM Dongle", then continue to the main GQRX window.

Select File->Start DSP. You should now be receiving something.
Tune to a local radio station between 88-108Mhz FM.
select Wide FM Stero as the Mode Type.


Now connect a proper external antenna to your RTL dongle or Softrock HF/VHF kit.
Hope you have lost of fun ;-)

Here is a video of GQRX using the 100Khz to 17Ghz RTL dongle in direct conversion mode.


How to configure your direct conversion dongle.

Here is the screen-shot of the configuration on Linux for Gqrx
  1. Device Select other
  2. Device String rtl=0,direct_sample=2 (possibly 0/1/2) (This number could differ depending on which pin was wired via balin)
 
 
Device String rtl=0,direct_sample=2
Here is a picture of the 100KHX to 1.7Ghz rtl dongle
100Khz to 1.7Ghz RTL direct conversion dongle
They are available at http://www.giga.co.za/ocart/index.php?route=product/product&path=59&product_id=178

Monday, September 9, 2013

How to setup Putty to do X forwarding for Linux Ubuntu and Raspberry Pi.

How to setup Putty to do X forwarding for Linux Ubuntu and Raspberry Pi. (Remote desktop your Linux)Remote control your Linux and Raspberry Pi

What is X windows forwarding on Linux?


X windows forwarding allows you to local display the applications that is running on a remote Linux server.
Install your favorite X windows server on your MS windows PC.
I will install my favorite Cygwin x windows server and will explained the steps here.


Start the x Windows server.


You Should see a X in the icon bar at the bottom of your desktop.


When done continue with the Putty installation steps here http://www.chiark.greenend.org.uk/~sgtatham/putty/

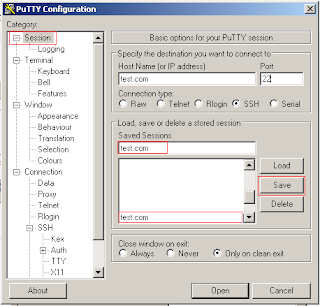
Install Putty and then run it to get to First configuration screen below.

1) Enter the Host-name or IP of your Linux server in host Name text box.  E.G www.yourdomain.com
2) Enter the Port if its not the default port 22

Putty Start-up Configuration screen


2) Click on the Connection >> SSH >> X11 Category in the tree view.


3) Save the configuration.


4) Open your new configuration.
Enter your username and password.

login as: user1
user@test.com's password:
Welcome to Ubuntu 12.04.3 LTS (GNU/Linux 3.5.0-23-generic i686)

 * Documentation:  https://help.ubuntu.com/

245 packages can be updated.
122 updates are security updates.

*** System restart required ***
Last login: Mon Sep  9 15:32:31 2013 from here.domain.com
user1@test.com:~$ 

5) Now see if X fording is setup on your Linux (by default it is enabled but not for the root user)
Run the command echo $DISPLAY
localhost:12.0

The value could be localhost:12.0 or 10.0

Do not su to any user otherwise your DISPLAY setting will not work.

"ls -l .Xauthority"  in the home directory to verify a file named .Xauthority exists. If so it should show permissions -rw-------

If you have to su to a different user you will have to copy the Xauthority file from your home directory to the home of the su user as well and check if the DISPLAY setting is also correct.

If you don't have a DISPLAY setting then run this command. export DISPLAY=<value from step above> 

6)Test it with  xterm or xclock

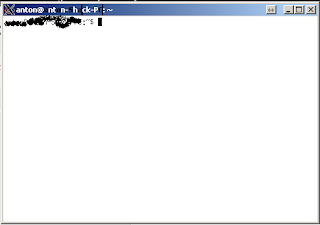
it could take some time for the xterm application window to pop up on your MS windows desktop.


and there you have it.

If you want your Raspberry Pi Full desktop and not just the app you start you could use the command on the Raspberry Pi startlxde

Saturday, January 26, 2013

Ethernet network interface not detected in Ubuntu 12.04

Ethernet interface eth0 not detected in Ubuntu 12.04


I got a new I7 ASUS motherboard P8H77-V (3 PCI Slots for sound cards) and Ubuntu 12.04  64Bit and 32bit versions did not detect the motherboard default Ethernet port.

Check that the led's flicker when you plugin the Ethernet cable, if not check in your bios and enable Ethernet there.

Here is what I had to do to make it work.
Run the following command in your terminal.

sudo  lspci
You should see the following in the list of devices to confirm this is the Ethernet interface you have.

 Ethernet controller: Atheros Communications Inc. AR8161 Gigabit Ethernet (rev 10)

Then install the driver from Ubuntu

Don't get the drivers released after 2012-05-10 it will not work

 wget -O- http://linuxwireless.org/download/compat-wireless-2.6/compat-wireless-2012-05-09-p.tar.bz2 | tar -xj

cd compat-wireless-2012-05-09-p

./scripts/driver-select alx
make
sudo Make install

Then load the new driver module.
sudo modprobe alx 
If your network cable is connected with your router on DHCP.

run ifconfig and you should see your interface eth0

ifconfig to see your new ethernet ports.

and it should work now.

Friday, January 18, 2013

Enabling Java for Chromium Web Browser on Linux

Enabling Java for Chromium Web Browser on Linux (for webSDR)

JRE = runtime only you cant compile java only run java
JDK = You can compile and run java
I installed the JDK as I am also a java developer (1.7 latest is fine) jdk-7u11-linux-x64.tar.gz

Change to the directory where you saved the download
Open command terminal
cd /home/anton/Downloads
tar -cvf jdk-7u11-linux-x64.tar.gz

It will unzip all the files creating a directory  similar to this jdk1.7.0_11cd /usr/lib/chromium-browser/plugins
cd jdk1.7.0_11
Need to add the java plugin into the Chromium Web Browser
The path mite be different on your Linux change to fit

cd /usr/lib/chromium-browser/plugins
sudo ln -s /home/anton/Downloads/jdk1.7.0_11/jre/lib/amd64/libnpjp2.so libnpjp2.so

Need to change the System default java to point to new java JDK I know installed above

sudo update-alternatives --install "/usr/bin/java" "java" "/home/anton/Downloads/jdk1.7.0_11/bin/java" 1

Know take you browser to http://zr6aic.giga.co.za:8901  and see if webSDR is know working.

Here is a map of webSDR receivers.

webSDR map


Thursday, October 4, 2012

Configuring the M-Audio (ICE1712 chip) Delta 44 for webSDR

Here is the steps I had to take to get my  M-Audio (ICE1712 chip) Delta 44 sound card working as a SDR input on a Ubuntu Linux computer.
Where can I get a Delta 44 sound cart interface for my SDR http://www.giga.co.za
or if you looking for softrock SDR you also can get it at  http://www.giga.co.za
Here is a picture of my configuration.


1) The Sound card has 4 input and 4 output ports but could only sample at 24-bit/96kHz full-duplex audio. This means I can only connect two softrocks lite II sound cards to my computer. 96kHz is a bit slow but this is all I can afford at the moment. (Need about 192kHz to display the full  40M band).

2) To configure the Delta 44 to be used for WebSDR was not so easy as I thought.

3) Ubuntu Linux is using  ALSA sound drivers for your sound-card interfaces and it took we a lot of reading to understand how it works.

4) My problem was that the webSDR server was only able to read ALSA devices defined as a 3 digit interface. (hw:[INT],[INT],[INT]) where INT must be replaced by integer values (0,1,2,3....) hw,[CARD],[DEV],[SUBDEV].

5) So I jumped right in and installed the Delta 44 card and needed to find out how to map the card input ports to (hw:[INT],[INT],[INT]) for the webSDR server to read the inputs. (to set the Delta 44 card audio levels run this command sudo envy24control) or a another good command is sudo pavucontrol

So the commands to list available ALSA sound input ports is as follows.


sudo arecord -l


**** List of CAPTURE Hardware Devices ****
card 0: M44 [M Audio Delta 44], device 0: ICE1712 multi [ICE1712 multi]
Subdevices: 1/1
Subdevice #0: subdevice #0
card 1: IXP [ATI IXP], device 0: ATI IXP AC97 [ATI IXP AC97]
Subdevices: 0/1
Subdevice #0: subdevice #0

So the commands to list available sound output ports is as follows.

sudo aplay -l


**** List of PLAYBACK Hardware Devices ****
card 0: M44 [M Audio Delta 44], device 0: ICE1712 multi [ICE1712 multi]
Subdevices: 1/1
Subdevice #0: subdevice #0
card 1: IXP [ATI IXP], device 0: ATI IXP AC97 [ATI IXP AC97]
Subdevices: 1/1
Subdevice #0: subdevice #0
card 1: IXP [ATI IXP], device 1: ATI IXP IEC958 [ATI IXP IEC958 (AC97)]
Subdevices: 1/1
Subdevice #0: subdevice #0

So in my case the the M-Audio sound card is 0 and my build in motherboard card Card 1. So we need to find out what is the sub device for this card 0.(What I found is if you reboot your computer the cards mite swap but if you explicit name the card on it's name M44  and not 0 it will always use the correct card)
sudo arecord -L


Home directory /home/anton not ours.
null
    Discard all samples (playback) or generate zero samples (capture)
default:CARD=M44
    M Audio Delta 44, ICE1712 multi
    Default Audio Device
front:CARD=M44,DEV=0
    M Audio Delta 44, ICE1712 multi
    Front speakers
surround40:CARD=M44,DEV=0
    M Audio Delta 44, ICE1712 multi
    4.0 Surround output to Front and Rear speakers
surround41:CARD=M44,DEV=0
    M Audio Delta 44, ICE1712 multi
    4.1 Surround output to Front, Rear and Subwoofer speakers
surround50:CARD=M44,DEV=0
    M Audio Delta 44, ICE1712 multi
    5.0 Surround output to Front, Center and Rear speakers
surround51:CARD=M44,DEV=0
    M Audio Delta 44, ICE1712 multi
    5.1 Surround output to Front, Center, Rear and Subwoofer speakers
iec958:CARD=M44,DEV=0
    M Audio Delta 44, ICE1712 multi
    IEC958 (S/PDIF) Digital Audio Output
default:CARD=IXP
    ATI IXP, ATI IXP AC97
    Default Audio Device
front:CARD=IXP,DEV=0
    ATI IXP, ATI IXP AC97
    Front speakers
surround40:CARD=IXP,DEV=0
    ATI IXP, ATI IXP AC97
    4.0 Surround output to Front and Rear speakers
surround41:CARD=IXP,DEV=0
    ATI IXP, ATI IXP AC97    
4.1 Surround output to Front, Rear and Subwoofer speakers
surround50:CARD=IXP,DEV=0
    ATI IXP, ATI IXP AC97
    5.0 Surround output to Front, Center and Rear speakers
surround51:CARD=IXP,DEV=0
    ATI IXP, ATI IXP AC97
    5.1 Surround output to Front, Center, Rear and Subwoofer speakersSo the IXP sound card is the one on the motherboard.

Ok I now have all the sound card info and need to configure the ALSA sound system environment to expose my sound card inputs as a 3 digit device.(eg hw:0,0,0 .....) I also have a additional requirement where I want to have multiple audio clients connect to the same input.
I want my SDR server to read the audio inputs and I also want my beacon / PSK monitoring application to monitor the SDR output. The sharing of the SDR output will have to be done by Linux application called jack.

The jack server will have to be configured to read SDR audio output and and allow the webSDR and other applications use the same audio stream.

configuring the ALSA file ~/.asoundrc or the /etc/asound.conf to define hardware audio interfaces.
The following options need to be configured in this file.

1) ALSA devices (hardware) and ALSA plugins (software).
2)  Device hw: and plughw: plugin give you access to the physical hardware. Both have as parameters the card (ID string or numerical index)
2) Control interface for the card.
3) Additional plugins for the card.
3.1) mixer, snoop , rate , lost more ......


ALSA recording device name for my M-Audio delta 44 (pcm.sdrM44Record) all 4 inputs
ALSA Playback device name pcm.sdrM44Play all 4 outputs


Here is my configuration file  ~/.asoundrc

#This configeration file is for sdr server pc.
#This pc has 3 sound cards
# 1) IXP motherboard (1 sterio input and 1 sterio output)
# 2) M44 M-Audio Delta 44 (4 mono inputs and 4 mono outputs)
# 3) Audiophile192 M-Audio Audiophile 192 (2 mono inputs and 2 mono outputs)

#************************** pcm definition ************************************
pcm.sdrMIXP_card{# interal sound card
        type hw
        card IXP #internal sound card
}
pcm.sdrM44_card {# defining the card to be used
     type hw
     card M44 # this has to be done to force reboot to point to same card
}
pcm.sdrAudiophile192_card {# defining the card to be used
     type hw
     card Audiophile192 # this has to the same as above to force reboot to point to same card
}
#************************* controle section ***********************************
ctl.sdrM44_card {#defining the control interface
     type hw
     card M44 # this has to the same as above
     }

ctl.sdrAudiophile192_card {#defining the control interface
     type hw
     card  Audiophile192 # this has to the same as above
     }

ctl.sdrIXP_card {#defining the control interface
     type hw
     card IXP  # this has to the same as above
     }

#******************************** channel dev *****************************
#        0 1   # front left
#        1 0   # front right
#        2 6   # rear left
#        3 7   # rear right
#        4 2   # center
#        5 3   # lfe
#        6 4   # side left
#        7 5   # side right

pcm.sdrM44_channel1 {#(only has 4 mono inputs/outputs)
    type plug #
    ttable.0.0 1 # studio monitor ...Delta 1 L
    ttable.0.1 1 # studio monitor ...Delta 2 R
#    slave.pcm ice1712
     slave.pcm pcm.sdrM44_card
}
pcm.sdrAudiophile192_channel1 {#(Only has 2 mono inputs/outputs)
    type plug #
    ttable.0.0 1 # studio monitor ...Delta 1 L
    ttable.0.1 1 # studio monitor ...Delta 2 R
    slave.pcm ice1724
}

pcm.sdrM44_channel2 {#(only has 2 mono inputs/outputs)
    type plug
    ttable.0.2 1 # studio monitor ...Delta 3 L
    ttable.0.3 1 # studio monitor ...Delta 4 R
    slave.pcm ice1712
}

#******************************** dmixer ***************************************
pcm.dmixer_M44 { # slave plugin dmixer
     type dmix
     ipc_key 4714
     slave {
     pcm sdrM440_card
     format S32_LE
     period_time 0
     channels 2 # 4 input
     period_size 512
     buffer_size 4096
     }
#     bindings {
#             0 0
#             1 1
#     }
}
#****************************** dsnoop ***************************************
pcm.dsnooper_M44 {
     type dsnoop #This plugin splits one capture stream to more streams
     ipc_key 4711
         slave {
         pcm sdrM44_card
         channels 2
         format S32_LE
         period_time 0
         period_size 512
         buffer_size 4096
        rate 96000
#       ttable.0.0 1 # studio monitor ...Delta 1 L
#       ttable.0.1 1 # studio monitor ...Delta 2 R
         }
         bindings {
                       0 0
                       1 1
         }
}
pcm.dsnooper_Audiophile192 {
     type dsnoop #This plugin splits one capture stream to more streams
     ipc_key 4711
         slave {
         pcm Audiophile192_card
         format S32_LE
         period_time 0
         period_size 512
         buffer_size 4096
         }
         bindings {
                       0 0
                       1 1
         }
}
#******************************* play ****************************************
pcm.sdrM44Play {# ouput
     type plug
     slave {
     pcm "dmixer_M44"
     }
}
#****************************** recording ***********************************
pcm.sdrM44Record { # input
     type plug
     slave {
     pcm "dsnooper_M44"
     }
}

pcm.sdrAudiophile192Record { # input
     type plug
     slave {
     pcm "dsnooper_Audiophile192"
     }
}


In webSDR I just add a device $pcm.sdrM44Record in place of $hw:0,0,0


I got the info from http://www.ruby-forum.com/topic/2162026


here is the jack configuration if you want to add jack.


pcm.jackplug {
 type plug
 slave { pcm "jack" }
}

pcm.jack {
 type jack
 playback_ports {
  0 pcm.sdrM44Play 

  
 }
 capture_ports {
  0 pcm.sdrM44Record

  
 }
}

I will add some more info as I get time.