How to Decode DMR-MARK (mototurbo) with SDRSharp and RTL dongle on Windows 7
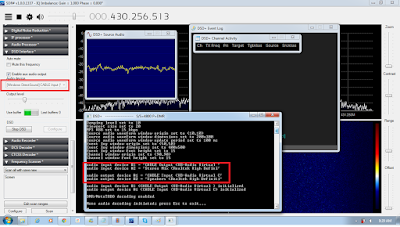 |
| DSD decoding with SDRSharp and RTL dongle. |
I found this website with very nice plugins for your SDR# software
http://rtl-sdr.ru/page/vse-dostupnye-na-etom-sajte-plaginy-s-kratkim-opisaniem (you can use this script to install all the plug-ins) http://rtl-sdr.ru/uploads/download/sdr-update.zip
Here is the list of plugins
- Audio Processor Displays range of audio signal contains 6 adjustable bandpass filters and customizable deemfazis filter.
- IF Processor Displays range IF signal to the demodulator, an asymmetric bandpass filter and a custom tracking notch filter.
- Base band Recorder Writes the entire IQ stream received from the tuner to a file, you can choose a folder to store the recordings, and there is a scheduler for recording time. Large buffer for recording flow with high sampling rate without any losses. It can be controlled from other plug-ins.
- IF Recorder Writes a stream of IQ intermediate frequency to a file, you can choose a folder to store the recordings, and there is a scheduler for recording time. It can be controlled from other plug-ins.
- Audio Recorder Writes the audio file. Ample opportunities to control the format of the output file (mono, stereo, bit rate, sample rate). Extensive records management (do not write in the absence of a signal, create new files when changing frequency, etc.). Customizable file and folder names.
- Decoder CTCSS squelch It displays the CTCSS tone in the presence of the signal and provides the squelch responds to set the tone.
- DCS Decoder Squelch Displays DCS codes in the presence of a signal and contains a squelch responsive to certain code or the presence of any code in the signal.
- AUX VFO Adds additional radio channels to SDR #. You can add more than one radio channel.
- DSD Interface The plug consists of three parts. The first - an additional audio output from the demodulator can be used to output the audio signal through a virtual audio cable to other programs (WXtoImage, DSD, etc.). The second - a graphical interface to configure and run a digital signal decoder DSDPlus. And the third - to automatically turn off the sound output SDR # when choosing a frequency with a digital signal.
- Time Shift It creates a memory buffer of up to several minutes. You can listen to the signals that have been broadcast and a present in the buffer. "All that is visible on the waterfall can be heard."
- Digital Audio Processor It contains audio bandpass filter squelch by the presence of an audio signal and a signal scrambler inversion spectrum.
- DDE Tracker + Scheduler Plug-in to communicate with the satellite tracking programs (Orbitron, WXTrack, SatPC32). When / companion care in the reception area is executed a list of commands for the satellite specified in the scheduler. It can control other plug-ins and run external programs.
- QPSK Demodulator Plug-in for QPSK demodulation signal from the Russian satellite Meteor-M2 in real time. The final signal may be recorded in a file or transmitted via TCP on special version LRPTDecoder for decoding in real time. It may interact with other plug-ins.
- TV The plugin displays the received PAL / SECAM TV signal. For receivers with a bandwidth of more than 7 MHz at the same time you can listen to the sound via the main radio SDR #. For rtl-sdr receivers need the modified file rtl-sdr.dll.
- Frequency Manager Modified standard frequencies Manager SDR #. Added scanner iterates through the selected frequency. Added Manage window manager and some other improvements.
- Frequency Scanner Fast scanner. It scans the specified frequency range. Saves frequency are not in the manager and activity time at these frequencies. It can scan multiple bands with different grid spacing, modulation bandwidth of the signal. There are modes of scanning all frequencies in the range, or only frequencies which are in the frequency or vice versa manager only frequencies that are not in the manager.
- MPX Output It displays the selected audio device MPX signal after WFM demodulator with sample rate conversion to 192 kHz for further processing in other programs (eg RDSSpy).
- Avia band 8.33 calculator Corrects manual input frequency range of air according to the standard steps for 8.33 kHz.
- IQ Correction This is analogous to the standard functions of SDR # IQ correction. For slower computers help save some CPU time. There is a separate mode for R820T tuners - removal of only a constant component correction IQ on these tuners are required.
- Audio Waterfall This plug-in created by Kiriyama. Adds SDR # waterfall displays the spectrum of the audio signal.21) Frequency LockThe function of this plugin is very simple, it blocks the frequency change settings in SDR #. Written at the request of the user to avoid accidental change of frequency of administration.
Here is a short description of the steps I took to install the SDRSharp plugins.
- Firstly you need to install the SDRSharp software. Here is a link how to do that http://giga.co.za/smf/index.php/topic,34.0.html
- Then Download the Plugin script from here. http://rtl-sdr.ru/uploads/download/sdr-update.zip
- Unzip the sdr-update,zip file in the directory where you have installed the SDRSharp.exe in step 1.
- Then unzip should create a directory sdr-update in the directory where the SDRsharp.exe file was unzipped.
- There should be 3 files in the sdr-update directory. (httpget.exe,setup.bat and unzip.exe) (dir)
- Make sure you have internet connection.
- Then run the setup.bat file in the directory.
- You will be asked some questions to override some installations and configurations, always say Y
- Download and unzip DSDPlus application in any directory of your choice for from here http://www.dsdplus.com/download/dsdplus/DSDPlus1p074.zip mite have to change version number if there is a newer one available.
- Create a start_dsdplus.bat file using Notepad in the directory where you unzipped the DSDPlus1p074.zip zip file.
- For now enter the following in the bat file with Notepad DSDPlus.EXE -i1 -o2 -fr
- Set the playback device as follows making the VB-Cable the default device and Speaker just ready.
- Set the recording settings as follows. (Set VB-Cable as default and Stereo Mixer as ready)
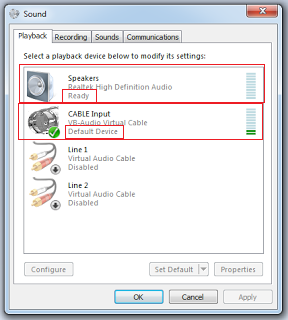 |
| SET VB-Cable as default and Stereo Mixer as ready. |
14) In the Recording tab set the VB-Cable as default device and Stereo Mixer ready.
15) Set the sound levels as follows.
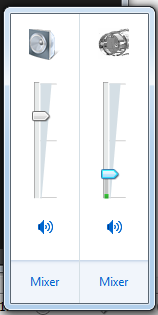 |
| set cable volume not to high |
16) Now run the start_dsdplus.bat file that you created in step 3 and check that the numbers correspond to the red in the pictures below.
17) i = Audio input to DSDPlus and o = Audio Output from DSDPlus
18) Input to DSPPlus must be from VB-Cable and not any other device (Stereo mixer in my case).
19) Output must go to Speakers in my case to 2
20)Your Audio input and output configuration should be different to the one I have.
21) You will then need to change it in the start_dsdplus.bat file and then re run start_dsdplus.bat file.
22) If your Audio Input and Output configuration is correct you will have to just set your audio levels coming from SDRSharp and going to speaker.
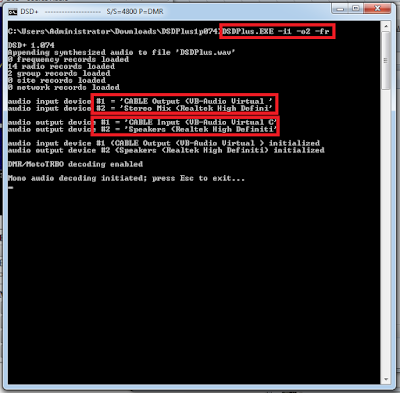 |
| Your sound card numbers will be different and you need to update the bat file |
24. Now we need to configure the DSD plugin in sdrSharp by giving it the path to your DSDPlus.
enter the path to your DSDPlus.exe in the DSD path block shown below. Now change the Audio settings in SDRSharp dsd plugin to be the same as as we did in the batch file by changing the audio device number.
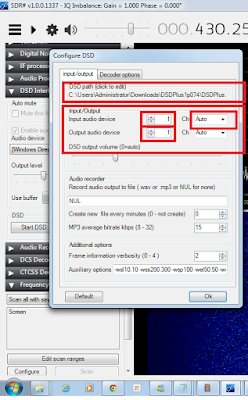 |
| Change input and output audio device as we did in batch file. |
26) Now select the VB-Cable option in the SDRSharp DSD plugin menu to point to the VB-Cable
27) Then tune to DMR frequency channel in your area with SDRsharp at the top frequency selection and start the DSD on the left menu.
I then got this warning pop box hidden behind my SDRSharp. Just click Run and the DSD popups will appear.
If all went right the following Scope,log and channel activity
popups will appear.
Final check that the correct VB-Cable is used for Audio input and speaker as output.
28) For best results, make sure that all your SDR# and VB-cable / VAC sample rates are set to 48kHz and that you have disabled “Filter Audio” in SDR#. Also, the audio volume of SDR# should not be set to high.
29)Here is a list of DMR frequencies in South Africa
Hope this help.
Let me know if you get stuck by adding comments at the bottom..


