Monday, September 9, 2013

How to setup Putty to do X forwarding for Linux Ubuntu and Raspberry Pi.

How to setup Putty to do X forwarding for Linux Ubuntu and Raspberry Pi. (Remote desktop your Linux)Remote control your Linux and Raspberry Pi

What is X windows forwarding on Linux?


X windows forwarding allows you to local display the applications that is running on a remote Linux server.
Install your favorite X windows server on your MS windows PC.
I will install my favorite Cygwin x windows server and will explained the steps here.


Start the x Windows server.


You Should see a X in the icon bar at the bottom of your desktop.


When done continue with the Putty installation steps here http://www.chiark.greenend.org.uk/~sgtatham/putty/

Install Putty and then run it to get to First configuration screen below.

1) Enter the Host-name or IP of your Linux server in host Name text box.  E.G www.yourdomain.com
2) Enter the Port if its not the default port 22

Putty Start-up Configuration screen


2) Click on the Connection >> SSH >> X11 Category in the tree view.


3) Save the configuration.


4) Open your new configuration.
Enter your username and password.

login as: user1
user@test.com's password:
Welcome to Ubuntu 12.04.3 LTS (GNU/Linux 3.5.0-23-generic i686)

 * Documentation:  https://help.ubuntu.com/

245 packages can be updated.
122 updates are security updates.

*** System restart required ***
Last login: Mon Sep  9 15:32:31 2013 from here.domain.com
user1@test.com:~$ 

5) Now see if X fording is setup on your Linux (by default it is enabled but not for the root user)
Run the command echo $DISPLAY
localhost:12.0

The value could be localhost:12.0 or 10.0

Do not su to any user otherwise your DISPLAY setting will not work.

"ls -l .Xauthority"  in the home directory to verify a file named .Xauthority exists. If so it should show permissions -rw-------

If you have to su to a different user you will have to copy the Xauthority file from your home directory to the home of the su user as well and check if the DISPLAY setting is also correct.

If you don't have a DISPLAY setting then run this command. export DISPLAY=<value from step above> 

6)Test it with  xterm or xclock

it could take some time for the xterm application window to pop up on your MS windows desktop.


and there you have it.

If you want your Raspberry Pi Full desktop and not just the app you start you could use the command on the Raspberry Pi startlxde

Thursday, September 5, 2013

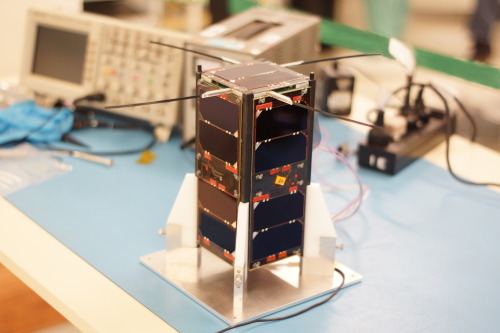
ZACUBE-1 (South Africa CubeSat-1)

ZACUBE-1 (South Africa)November 21st at  07:11:29 UTC.


The amateur radio CubeSat designed and built by students at the Cape Peninsular University of Technology in Bellville.
The current launch info has lift off scheduled for November 21st at  07:11:29 UTC.
Live launch video http://live.cput.ac.za/live.html
You should be able receive ZACUBE-1 satellite on this weSDR.


Satellite seems to be in 1k2 mode at the moment.
The keps that seems to be the best at the moment is 2013-066B (27Nov2013) from http://www.celestrak.com/NORAD/elements/tle-new.txt

TX power at the moment 0.5 wat.
more info at http://www.cput.ac.za/fsati
Here is a video recording of the telemetry.


The objectives of the mission are:
1) Training of post-graduate students in Satellite Systems Engineering.
2) Earth observation using a visible band matrix imager payload and an S-Band payload data transmitter (2.4 to 2.45 GHz).
3) UHF Store & Forward system (70 cm amateur band).


  • Uplink is 145.860 MHz
  • Downlink 437.345 MHz. Both links have selectable transmission rates of 1.2 kbps or 9.6 kbps.
  • Visible band matrix imager 115200 bps L-Band to S-band data transponder. (2.4 to 2.45 GHz).
  • HF beacon 14.099 MHz Hermanus Magnetic Observatory’s Dual Auroral Radar Network antenna at SANAE base in Antarctica (The HF beacon payload on 14.099 MHz ).
To decode the telemetry of ZAcube-1 download the software from http://www.dk3wn.info/software.shtml
Telemetry format

0C 16 - header
7A 61 63 75 62 65 30 31 2E - ASCII Text message00 00 19 6d 2C - Timestamp (ticks)0B 0e 2C - Battery bus voltage (volt)06 ad 2C - OBC temperature (°C)00 2E - Command counter

Telemetry decoder from http://www.dk3wn.info/software.shtml
Here is some pictures from the ZACUBE-1 camera


And many more follow the link to there site
http://www.cput.ac.za/blogs/fsati/2014/01/22/south-africa-on-a-clear-day-as-seen-by-tshepisosat/
Read more about it here.

Saturday, August 24, 2013

Now added 70cm Satellite webSDR with Egg Beater antenna and low noise amplifier.

Now added 70cm Satellite webSDR with Egg Beater antenna and low noise amplifier.

here is the link to the 70cm websdr described below


1) Eggbeater antenna.
Home build more details here http://zr6aic.blogspot.com/2013/03/building-my-eggbeater-ii-omni-leo.html
a Video on how to build the Eggbeater antenna


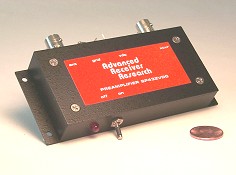
2) Low noise Amplifier (SP432VDG)

from http://www.advancedreceiver.com/page7.html

High Performance In-line Rf Switched Amateur Preamplifier

3) RTL dongle
more info here http://zr6aic.blogspot.com/search/label/rtl_tcp
Where to get a dongle http://www.giga.co.za


4) webSDR
more info here http://zr6aic.blogspot.com/search/label/WebSDR


Saturday, July 27, 2013

EchoLink on Ubuntu (Setting up Svxlink server and qtel)

EchoLink on Ubuntu. (12.04) (Setting up Svxlink server and qtel)

Svxling is a application that allows you to setup a Echolink link or a Echolink repeater on your server.
You will need to build a interface between your computer Serial port and Mic and line in and outputs of the available sound card on your server.
Here is a typical interface diagram. You can get this interface in prebuild format at http://www.giga.co.za/ocart/index.php?route=product/product&product_id=385&search=radio+digi


Computer to Radio interface.


Jingtong Radio interface.
Jingtong HT

I now use the Baofeng uv-5r and not the Jingtong due to the squelch not being stable.


Qtel is a Echo link client that allows you to connect to Echolink system as a client simulating a radio. Communication is done using VOIP from your client to Echolink system.

Here is the steps that you neet to take if you want to set-up Svxlink link or you could only install client Qtel see nr 4.

You will have to verify your call-sign on http://www.echolink.org/ with proof of your Radio amateur license documents. (The verification process can take 24 ours, so do it upfront and you need to verify your call sign for -L link and -R repeater options)

Ones this is done you will have call-sign and password required for the configuration below.

I would suggest you get a APRS servers password as well but is not required to get your Svxserver going. ( you could add the APRS functionality later.)
1) First add the Svxlink repository ref. to Ubuntu 
sudo add-apt-repository ppa:felix.lechner/hamradio

2) Update all repository config files for Ubutu.
sudo apt-get update

3) Install the Svxlink from the new repository configerd above.
sudo apt-get install svxlink-server

4) Install the qtel client.
sudo apt-get install qtel

5) Configure the Svxling server confugeration
sudo vi /etc/svxlink/svxlink.conf

6) Change the following fields in the /etc/svxlink/svxlink.conf file

LOCATION_INFO
     Example:
     LON_POSITION=09.02.20E
     Example:
     LAT_POSITION=51.02.22N

CALLSIGN
     Examples:
     CALLSIGN=EL-ZR0ABC # callsign for a link EL for link and ER for repeater.

PTT_PORT
     Examples:
     PTT_PORT=/dev/ttyS0 # this could be a USB serial port  /dev/ttyUSB0 ?? change this to your device

FREQUENCY
     Example:
     FREQUENCY=430.050 # tx-frequency is 145.550 MHz (Radio Frequency)


TX_POWER
     Example:

     TX_POWER=3 # tx output is 3 watts

ANTENNA_GAIN
     Example:

     ANTENNA_GAIN=5 # antenna gain is 5 dBd

ANTENNA_HEIGHT


     Example: 
     ANTENNA_HEIGHT=10m # 10 meters above the ground 
     OR ANTENNA_HEIGHT=90 # 90 feet

Save the file.

Now comes the difficult part where you need to define your audio device for TX and RX.

Run the Command sudo aplay -l  This command will display all the alsa devices that can play sound to ext Speak.

sudo aplay -l
**** List of PLAYBACK Hardware Devices ****
Home directory /home/anton not ours.
card 0: Intel [HDA Intel], device 0: ALC662 rev1 Analog [ALC662 rev1 Analog]
  Subdevices: 1/1
  Subdevice #0: subdevice #0

sudo arecord -l


In my case I only have one device "card 0: Intel [HDA Intel]"

You could properly use the device name Intel.

And to get the input device available on your computer run the command sudo arecord -l

sudo arecord -l


**** List of CAPTURE Hardware Devices ****
Home directory /home/anton not ours.
card 0: Intel [HDA Intel], device 0: ALC662 rev1 Analog [ALC662 rev1 Analog]
  Subdevices: 1/1
  Subdevice #0: subdevice #0
card 1: V10 [FUNcube Dongle V1.0], device 0: USB Audio [USB Audio]
  Subdevices: 1/1
  Subdevice #0: subdevice #0

In my case there was two devices and I wanted to use the same alsa device and above so it will be the "Intel" device
Defining alsa device by going to your home directory 
cd
now edit the asla config file .asoundrc in your home directory (create one if it dose not exists)

sudo vi .asoundrc    The Intel part in the file must be changed to have your computers interface card name from the above process.

#This configuration file is for alsa interface configuration.
# 1) Intel motherboard (1 stereo input and 1 stereo output)
#
#************************** pcm definition ************************************
pcm.Intel_card {# defining the card to be used
     type hw
     card Intel # this has to be done to force reboot to point to same card
}
#************************* control section ***********************************
ctl.Intel_card {#defining the control interface
     type hw
     card Intel # this has to the same as above
     }


Save the file.


Now edit the line AUDIO_DEV=alsa:pcm.Intel_card in the sudo vi /etc/svxlink/svxlink.conf file with the name U defined in the .asoundrc file U edited above ( in section Rx1 and Tx1)

Save the file.

Now you need to configure the echo-link connectivity details.
sudo vi /etc/svxlink/svxlink.d/ModuleEchoLink.conf

change the following fields.

CALLSIGN=CALLSIGN-L # your callsign

PASSWORD=your_verified_password #verify you callsign at http://www.echolink.org/

SYSOPNAME=your name and info

LOCATION=[Svx] Fq, your location town ....

DESCRIPTION="You have connected to a SvxLink node,\n"
            "a voice services system for Linux with EchoLink\n"
            "support.\n"
            "Check out http://svxlink.sf.net/ for more info\n"
            "\n"
            "QTH:     South of Johannesburg, South Africa\n"
            "QRG:     Simplex link on 145.550 MHz\n"
            "CTCSS:   My_CTCSS_fq_if_any RX only working on TX Hz\n"
            "Trx:     My_transceiver_type Jingtong JT-208\n"
            "Antenna: My_antenna_brand/type/model Mag mount 1/4 on house roof\n"

Save a file and you should be ready to start the server.

Before we start the server with start-up script lets check if there is any errors.

Run the command sudo svxlink


if all is ok you should see something like this.

SvxLink v0.13.0 (Apr 15 2012) Copyright (C) 2011 Tobias Blomberg / SM0SVX

SvxLink comes with ABSOLUTELY NO WARRANTY. This is free software, and you are
welcome to redistribute it in accordance with the terms and conditions in the
GNU GPL (General Public License) version 2 or later.

Using configuration file: /etc/svxlink/svxlink.conf
--- Using sample rate 48000Hz

Starting logic: SimplexLogic
Home directory /home/anton not ours.
Loading module "ModuleHelp" into logic "SimplexLogic"
        Module Help v0.7.0 starting...
Loading module "ModuleParrot" into logic "SimplexLogic"
        Module Parrot v0.7.0 starting...
Loading module "ModuleEchoLink" into logic "SimplexLogic"
        Module EchoLink v0.10.1 starting...
*** WARNING: The value of ModuleEchoLink/LOCATION is too long. Maximum length is 27 characters.
Loading module "ModuleTclVoiceMail" into logic "SimplexLogic"
        Module Tcl v0.3.0 starting...
Event handler script successfully loaded.
EchoLink directory status changed to ON
--- EchoLink directory server message: ---
To ensure security, each
callsign used with EchoLink
must be validated.  The
callsign you are using has
not yet been validated.

Several different validation
options are available.  To
begin, please go to
www.echolink.org and click on
Validation.


Debugging


1) if you get an error like this.

*** ERROR: The sample rate could not be set to 8000Hz for ALSA device "pcm.Intel_card". The closest rate returned by the driver was 44100Hz.
*** ERROR: Could not open audio device for receiver "Rx1"

Most build in sound-cards should be able to handle 96000 or 48000Hz
Change the sample rate by editing the config file

Try uncommenting the CARD_SAMPLE_RATE=48000 and change it to 8000 or 16000 or 48000 in the /etc/svxlink/svxlink.conf file (high value is better)

2) if you get an error like this.

open serial port: Input/output error
*** ERROR: Could not initialize TX "Tx1"
*** ERROR: Could not initialize Logic object "SimplexLogic". Skipping...
*** ERROR: No logics available. Bailing out...

This means the serial port defined above PTT_PORT=/dev/ttyS0 is wrong and you need to get the correct port. (If you are using USB serial port it could be something like /dev/ttyUSB0)

3) If you get an error like this.
*** WARNING: SvxLink can only handle WAV files with sample rate 8000: /usr/share/svxlink/sounds/en_US/EchoLink/name.wav

It seems that the Ubuntu install install 16 bit audio files by default.
You can check the files by running the command.
file  /usr/share/svxlink/sounds/en_US/Default/0.wav
This what you will get from the command conferming it is 16bit

/usr/share/svxlink/sounds/en_US/Default/0.wav: RIFF (little-endian) data, WAVE audio, Microsoft PCM, 16 bit, mono 16000 Hz
I had to replace the files with this link https://launchpad.net/~felix.lechner/+archive/hamradio/+build/4783829

backup the existing wave files
Remove / uninstall the 16 khz files
sudo dpkg -r  svxlink-sounds-en-us-heather-16khz

Download the install file
Run sudo wget https://launchpad.net/~felix.lechner/+archive/hamradio/+build/4783829/+files/svxlink-sounds-en-us-heather-8khz_11.11-1~raring~ppa1_all.deb

Run the command
sudo dpkg -i svxlink-sounds-en-us-heather-8khz_11.11-1~raring~ppa1_all.deb

There should be now errors. (if there is errors tel me how you got it fixed below)
Normally you could just edit the /etc/svxlink/svxlink.conf file and fix the error.

My start up scrips did not work with the default instillation procedure as above and I had to add additional info in the script /etc/init.d/svxlink-server as follows.

4) If you get an error like this when you start up svxlink-server: 39: [: -eq: unexpected operator
It also means your PTT_PORT=/dev/ttyS0 is not set correctly.

I had to add the following lines.


Edit the file
sudo vi /etc/init.d/svxlink-server
add the following
LOGFILE=/var/log/svxlink # just below the PATH line

and changed RUNASUSER=svxlink to RUNASUSER=root 


Now lets start the Svxlink server.
sudo /etc/init.d/svxlink-server start

Check that the process is running.
sudo ps -ef | grep svxlink

We still need to adjust the audio levels for tx and rx.
run the alsa mixer to adjust the audio levels

run  sudo alsamixer   In my case I gad to set the Capture volume for the Audio from radio.

The log file will indicate if the level is set to high.


alsamixer (F5, F6, space bar, m, up, down selection keys )


Tail the log file for possible configuration errors when u start the server.

sudo tail -f /var/log/svxlink


To stop the server 
sudo /etc/init.d/svxlink-server stop

How to start Qtel client

sudo qtel

Linux Qtel Client

Qtel CLient


Client on windows

Echolink Client


Android Client
Echolink Station list


Link connection screen
Connection view


If the APRS server details, username and password is configured correctly you should be able to see your station on the APRS map.
What is nice is the fact that your APRS station details get updated with connection details as stations connect to your Svxlink server.


EL-ZR6AIC APRS


Please give me feedback on any mistakes.
more info is avalible at http://www.svxlink.net/?tag=svxlink-server-on-ubuntu-12-04

Monday, July 15, 2013

Why not put your own Satellite in space ?

 for as little as $19.00


  1. Transmitter power is 10mW DSSS transmitted through a dipole. The maximum solar panel power available on the standard device is 100mW. 
  2. Hardware Development Scouts can potentially have as much as 500mW solar power.
  3. The orientation of the device in orbit around the earth should be able to be determined most accurately by use of the magnetometer.
  4.  It might also be possible to work out orientation by using the single pixel sensor as a moon/earth/sun sensor.
  5. They will be doing there best to make the landing site the earth side of the moon.
  6. If you are, or would like to be, a radio amateur, they will show you how to communicate directly with your spacecraft in space when it is nearby using inexpensive UHF and S-band equipment. Communication at (cis-)lunar distances is more expensive (typically requiring 5-24m+ steerable dishes), but available to some clubs and enthusiasts.

More info is available at http://www.kickstarter.com/projects/1677943140/send-your-own-pocket-spacecraft-on-a-mission-to-th

Tuesday, June 4, 2013

Shell scripts to stop and Start your rtl_tcp Dongle (bash script) on Linux

Shell scripts to stop and Start your RTL Dongle (bash script)

Script to start rtl_tcp
1) Create a directory where you will store your scripts and where to save your process id.

mkdir sh   
cd sh  
mkdir pid

2) Use your favorite text editor (vi ...) and create a file (start_rtl.sh) with the following content
3) Change the pid file path to your directory as well as where the rtl_tcp excusable is.
4) Add port , ip if so required.
5) to find the path to rtl_tcp directory just use the command type rtl_tcp and you should get the path returned.

#!/bin/bash
#This program will write pid file
#pidfile
pidfile=/home/usersdir/sh/pid/rtl.pid
PROGRAM=/usr/local/bin/rtl_tcp
# We start app and create the pidfile
#Supported gain values for rtl_tcp (14): -1.0 1.5 4.0 6.5 9.0 11.5 14.0 16.5 19.0 21.5 24.0 29.0 34.0 42.0
        sudo $PROGRAM -g 42.0 &
        PID=$!
        echo $PID > "$pidfile"
        echo Program has started

Create a stop script wit your editor (stop_rtl.sh) in the same directory U created start script with the following content

#!/bin/bash
#This program will readthe pid file
#pidfile
pidfile=/home/userdir/sh/pid/rtl.pid
PROGRAM=/usr/local/bin/rtl_tcp
# We kill app and remove the pidfile``
        pid2kill=`cat $pidfile`
        kill -9 $pid2kill
        rm $pidfile

To run or stop the scripts just run sudo ./start_rtl.sh  or sudo ./stop_rtl.sh

Hope this helps.

Thursday, May 23, 2013

NEE-01 PEGASUS Cubesat

NEE-01 PEGASUS Cubesat


Height: 650km 
Mass: 1266.6 g 
Frequency: Central: 910MHz 
Bandwidth: 25Mhz 
EIRP: 34.1dBm
Carrier: FM
Audio Modulation: AMTV / CW (3 carriers) / SSTV (various modes) 


Monday, May 13, 2013

ESTCube-1 Satellite CubeSat

ESTCube-1 Satellite CubeSat


 It was launched on 7 May 2013
Circular orbit at an altitude of 820 km
CW Beacon 437.250 MHz , call sign (ES5E/S)

  • Output power: 0.1 W
  • CW Bitrate: approximately 9 bps, 18 WPM
  • Sending period: 3 to 4 minutes

AX.25 telemetry 437.505 MHz – 9600 bps , Call sign (ES5E-11)

More details are availbel from http://www.estcube.eu/en/radio-details

Tuesday, May 7, 2013

How to do AFSK, PSK DTMF demodulation on Linux / Raspberry Pi using your RTL dongle

How to do AX25, AFSK, DTMF, POCSAG and PSK demodulation on Linux.

(RTL 2832U  receiver) Where can I get a RTL dongle http://www.giga.co.za


RTL 2832U


Using the programs multimon, sox, mkfifo, rtl_fm, git and RTL 2832U receiver you can demodulate the following modulations.

AX.25 (https://github.com/EliasOenal/multimon-ng/blob/master/README.md)
  • 1200 Baud AFSK
  • 2400 Baud AFSK (2 variants)
  • 4800 Baud HAPN
  • 9600 Baud FSK (G3RUH)
POCSAG
  • 512 Baud
  • 1200 Baud
  • 2400 Baud
Miscellaneous
  • DTMF
  • ZVEI
  • SCOPE

1) Download the following Library by using git
git clone https://github.com/EliasOenal/multimon-ng.git

cd to the multimon directory
cd multimon-ng
run the command make
mkdir build
cd build
qmake ../multimon-ng.pro
make
sudo make install

If you want to get this working on Raspberry pi you need to use the following

qmake --version qmake: could not exec '/usr/lib/x86_64-linux-gnu/qt4/bin/qmake': No such file or directory 
alias qmake="$(find /usr -name qmake | grep qt5)" 
qmake --version QMake version 3.0 Using Qt version 5.3.2 in /usr/lib/x86_64-linux-gnu


Command line options. (here is the help file) multimon-ng [options] [input_file]

sudo sudo multimon-ng -h
multimon-ng  (C) 1996/1997 by Tom Sailer HB9JNX/AE4WA
             (C) 2012-2014 by Elias Oenal
available demodulators: POCSAG512 POCSAG1200 POCSAG2400 FLEX EAS UFSK1200 CLIPFSK FMSFSK AFSK1200 AFSK2400 AFSK2400_2 AFSK2400_3 HAPN4800 FSK9600 DTMF ZVEI1 ZVEI2 ZVEI3 DZVEI PZVEI EEA EIA CCIR MORSE_CW DUMPCSV SCOPE

Usage: multimon-ng [file] [file] [file] ...
  If no [file] is given, input will be read from your default sound
  hardware. A filename of "-" denotes standard input.
  -t <type>  : Input file type (any other type than raw requires sox)
  -a <demod> : Add demodulator
  -s <demod> : Subtract demodulator
  -c         : Remove all demodulators (must be added with -a <demod>)
  -q         : Quiet
  -v <level> : Level of verbosity (e.g. '-v 3')
               For POCSAG and MORSE_CW '-v1' prints decoding statistics.
  -h         : This help
  -A         : APRS mode (TNC2 text output)
  -m         : Mute SoX warnings
  -r         : Call SoX in repeatable mode (e.g. fixed random seed for dithering)
  -n         : Don't flush stdout, increases performance.
  -e         : POCSAG: Hide empty messages.
  -u         : POCSAG: Heuristically prune unlikely decodes.
  -i         : POCSAG: Inverts the input samples. Try this if decoding fails.
  -p         : POCSAG: Show partially received messages.
  -f <mode>  : POCSAG: Disables auto-detection and forces decoding of data as <mode>
                       (<mode> can be 'numeric', 'alpha' and 'skyper')
  -b <level> : POCSAG: BCH bit error correction level. Set 0 to disable, default is 2.
                       Lower levels increase performance and lower false positives.
  -o         : CW: Set threshold for dit detection (default: 500)
  -d         : CW: Dit length in ms (default: 50)
  -g         : CW: Gap length in ms (default: 50)
  -x         : CW: Disable auto threshold detection
  -y         : CW: Disable auto timing detection
   Raw input requires one channel, 16 bit, signed integer (platform-native)
   samples at the demodulator's input sampling rate, which is
   usually 22050 Hz. Raw input is assumed and required if piped input is used.


how to decode a wav file

sudo ./multimon-ng -s SCOPE -t wav /tmp/message.wav (to read wav file) How to convert a wav file to row file using sox sudo sox foo.wav foo.raw
Now we want to take the received signal from rtl_fm and pyp it to the multimon
Create a fifo Pyp 
sudo mkfifo soundfifo.raw 
ls -al 
prw-r--r--  1 anton anton     0 2013-05-07 22:35 soundfifo.raw

You will see its not a normal file its got a prw in front of the file definition when you list the files.
Lets get multimon to start receiving audio from soundfifo.raw pyp.
sudo multimon-ng -a AFSK1200 -a SCOPE -t raw soundfifo.raw
 
And now send the audio from rtl_fm to the soundfifo.raw
Decoding live data from rtl receiver. (Tuning receiver to 144.800 Mhz packet frequency and demodulate that to 22.05kHz audio)
 sudo rtl_fm -f 144800000 -s 22050 ./soundfifo.raw (read my section on rtl if you want to install rtl utilities)


You should then see the scope screen below.
 

Multimon Scope Display
And your afsk1200 decoding will start in console and the scope display will show your audio.
Here is an example of hot to decode directly from rtl dongle sudo rtl_fm -d0 -f 144800000 -s 22050 - | multimon-ng -a AFSK1200 -t raw /dev/stdin

Hope this help...
REF: www.baycom.org/~tom/ham/linux/multimon.html, http://www.youtube.com/watch?v=GBmli8Vflig and http://www.ultratechie.com/2012/10/pigate/
https://github.com/EliasOenal/multimon-ng/blob/master/README.md

Monday, May 6, 2013

CubeBug-1 Cube Satellite

The CubeBug-1 2U CubeSat, also known as Capitán Beto


Beacon 437438 MHz AFSK AX.25, 1200 bps (callsign LU1VZ-11.)

  • 1 watt output
  • After the technology demonstration part of the mission is over, the satellite will enter a mode that will include services to the Amateur radio community, including an AX.25 Packet Radio Digipeater, science data downloads from the payload (including images if possible).


More info here http://1.cubebug.org
and http://www.pe0sat.vgnet.nl/satellite/cube-nano-picosats/cubebug-1/

Sunday, May 5, 2013

TURKSAT 3USAT Satellite

TURKSAT 3USAT Satellite

You could listin to my websdr on Sat freq http://zr6aic.giga.co.za:8902/ (Egg Beater mark 2 Antenna)


Stats:
  • Down-link 435.200 – 435.250 MHz Linear Transponder ("Tracking"mode "inverting")
  • Up-link 145.940 – 145.990 MHz Linear Transponder.
  • Beacon 437.225 MHz CW ( " YM2RTU "call sign)
  • 680 km Low Earth Orbit (LEO)
Reception report submission page.  http://translate.googleusercontent.com/translate_c?depth=1&hl=en&ie=UTF8&prev=_t&rurl=translate.google.com&sl=auto&tl=en&u=http://turksat3usat.tamsat.org.tr/info/&usg=ALkJrhgd6DgnRP57nAmSzIGxg5F8v5ufAQ

Here is the info regarding this satellite.
 http://amsat-uk.org/satellites/turksat-3usat/


Latest Kep's for TURKSAT 3USAT
New TLE info:  http://www.celestrak.com/NORAD/elements/tle-new.txt
Satellite 3USAT number: 2013-018C

Cube Bug-1 Satellite was launched on same rocket.

Thursday, April 4, 2013

WSPR service now added to ZR6AIC SDR receivers. (30m and 40m)

WSPR service now added to SDR receivers.

1) I  have added WSPR receivers for 40m and 30m.
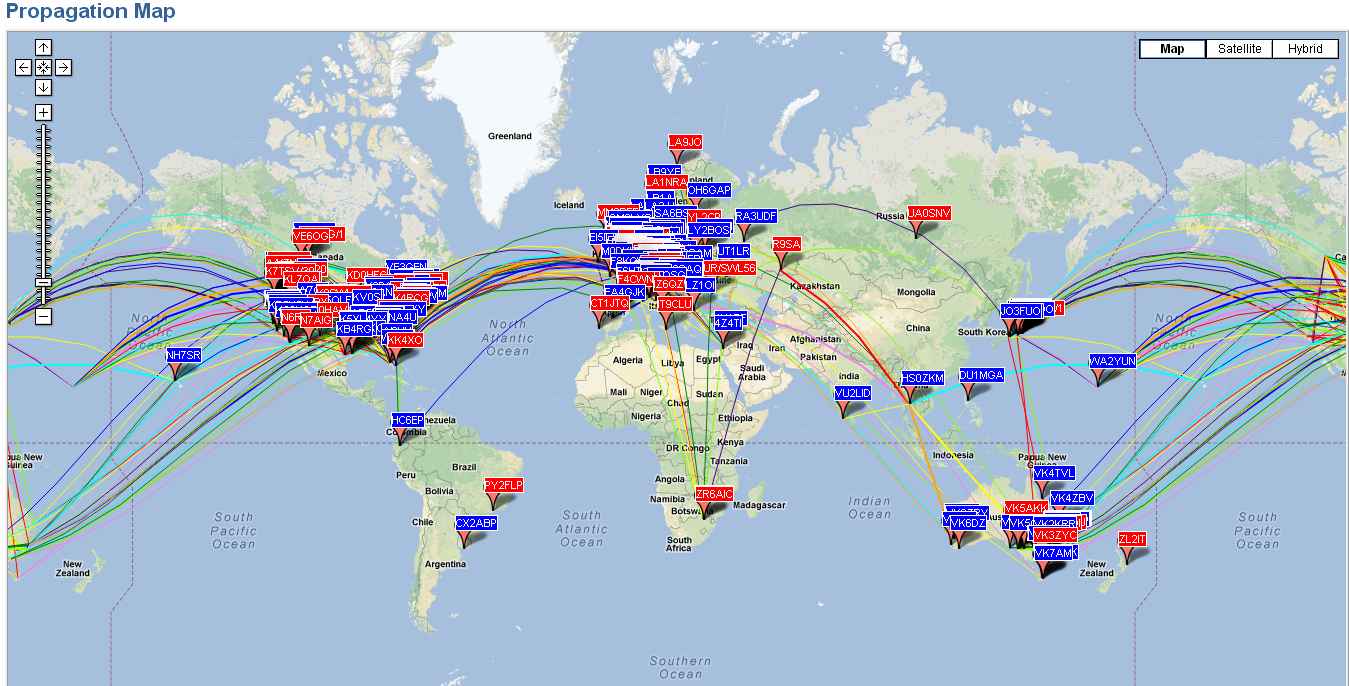
You can now have a look at the map for ZR6AIC and all the reception reports.
The WSPR servers is running of the existing webSDR recevers using ALSA I/Q snoop feed split.


Here is some images from my first day of reception.
Last 24 hours for ZR6AIC

Last 10 minutes for the hole world
4/4/2013 at 10:10 GMT

5 Feb 2014 24 Hour ZR6AIC 30m and 40m band (20:36 GMT )